This tutorial is another way of doing Mosaic Crochet. I am calling this the OVERLAY Mosaic Crochet because this method employs the main characteristics found in Overlay Crochet: namely, working in the BLO (back loop only) and dropping down to pick up the front loop of stitches in lower rows.
FYI: In Overlay Crochet, we take advantage of the fact that by laying stitches over other previous rows, we can create lovely and intricate textural patterns.
And thanks to a comment by chipnanna (comments section), let me just state explicitly: this Overlay Mosaic Crochet method does not use the chain-spaces employed in my earlier mosaic crochet tutorial (which I have now named the Chain-Sp Mosaic Crochet {see Mosaic Crochet Overview – the Differences, for a fuller explanation}).
I didn’t “create” this method but I am assigning the name, “Overlay Mosaic Crochet (OMC)” as a clear and easy way to refer to this and differentiate from the first method I documented before.
How to do Overlay Mosaic Crochet
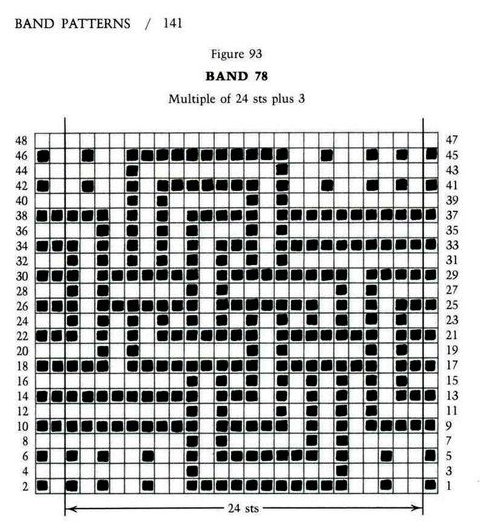
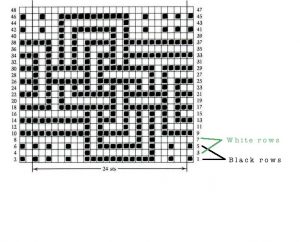
Let’s use this Barbara Walker’s chart again.
Foundation Row: R0 (zero)
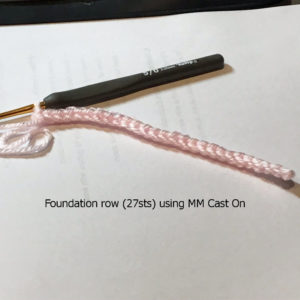
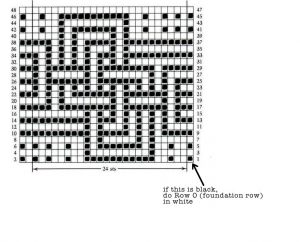 Even tho it is usually not shown on the chart, we always start off with one foundation row of sc (single crochet).
Tip: you can also do the foundation row with a row of Foundationless Single Crochet or with my favourite: MM Foundation Row.
If the starting square is black, then the foundation row (R0) will be in white.
- black square = Dusky Pink yarn
- white square = Pale Pink yarn
Reading Directions
R1 & all odd rows (RS) – read from right to left (R=>L)
R2 & all even rows (WS) – read from left to right (L=>R)
(But really, you won’t need to read on even rows. As I will shortly explain..)
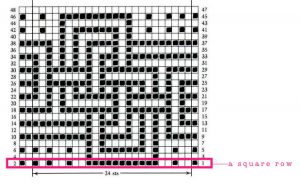
A Sq-Row is a Row of Squares – representing 2 rows of work.
A sq-row is a Row of Squares on the graph. And each sq-row is made up of 2 crochet rows (e.g. R1&R2) and means you read/crochet row one from R=>L , then next row from L=>R – in the one colour.
Then for the next sq-row (e.g. R3&R4), you read/crochet the row from R=>L, then the next row from L=>R – in the next colour.
Identifying Which Colour per Sq-Row
The right-most square of each row of squares on the graph, identifies the colour you will be working with.
Tip: I don’t have to say you can substitute the B/W shown with any colours of your choice, right? And that you can change that duo colour combination at any row. I am sure you realise that already, right?
Reading the Sq-Rows
• In Overlay Mosaic Crochet (OMC), all stitches are worked in BLO (back loop only) unless otherwise stated and unless we are picking up stitches from lower rows.
• When we pick up stitches from lower rows, we always crochet into the Front Loop only.
Let’s start reading the chart. Starting at the bottom-right of the chart.
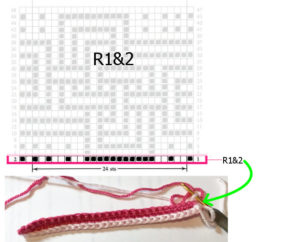
Black Sq-Row (R1&2):
EXCEPTION! The first Sq-Row is going to be different from other rows. If this is going to be a black sq-row, then crochet the 2 rows in [sc in BLO]. (Yes, work in the back look only for both R1&R2).
Don’t Worry!
Don’t worry that R1 & R2 looks nothing like the graph right now. The magic is coming …!
From now on:
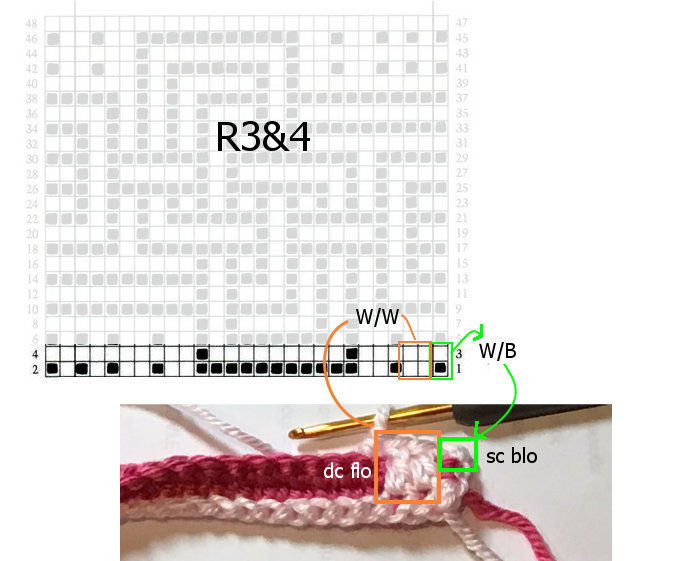
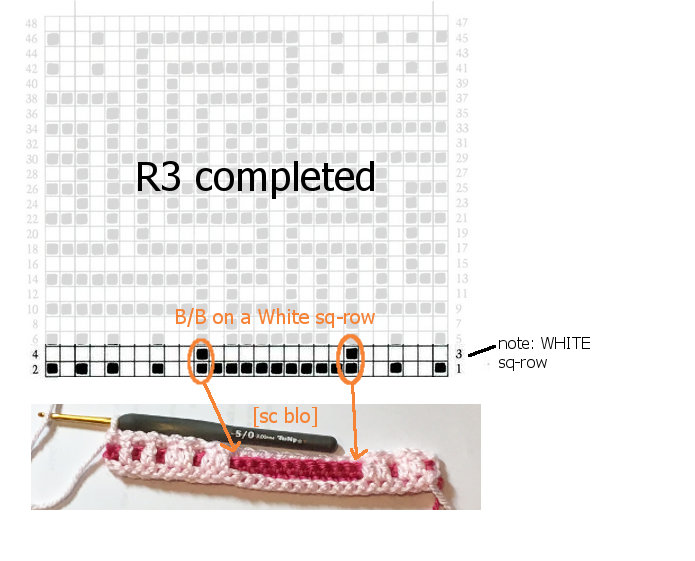
On a White Row: when you see ..
• White col. sq over Black col. sq (W/B), you will [sc BLO]
• B/B ==> [sc BLO]
• W/W ==> [dc FLO] (front loop only) into corresponding stitch, 2 rows down
On a Black Row: when you see ..
• B/W ==> [sc BLO]
• W/W ==> [sc BLO]
• B/B ==> [dc FLO] (front loop only) into corresponding stitch, 2 rows down
To demonstrate, lets look at the next sq-row up (i.e. R3&4)
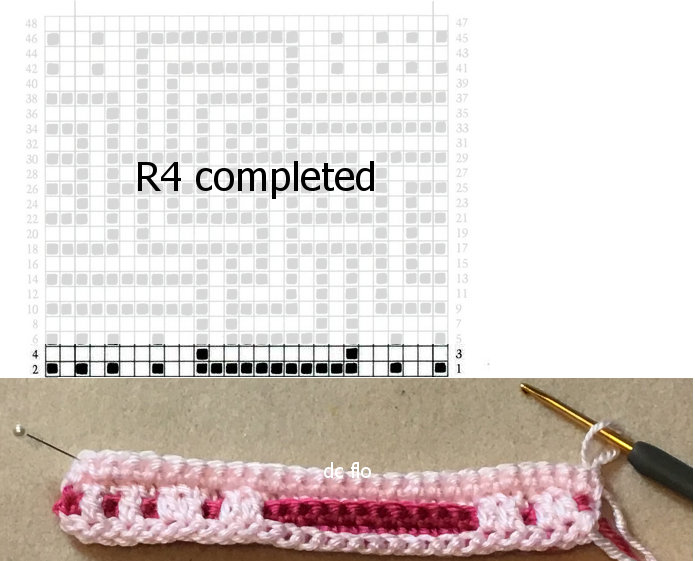
White Sq-Row (R3&4):
R3: In a White row on the chart, you will only [dc flo], directly two rows down (i.e. here it will be into R1) when you read W/W.
Otherwise, [sc blo] all other stitches.
R4: Remember at the start of this tutorial, I hinted that you would not even have to refer to the graph on even rows. Here’s why … on every even row, you will just [SC BLO] on every stitch; back to the start where the next colour is ready to be picked up for the next row.
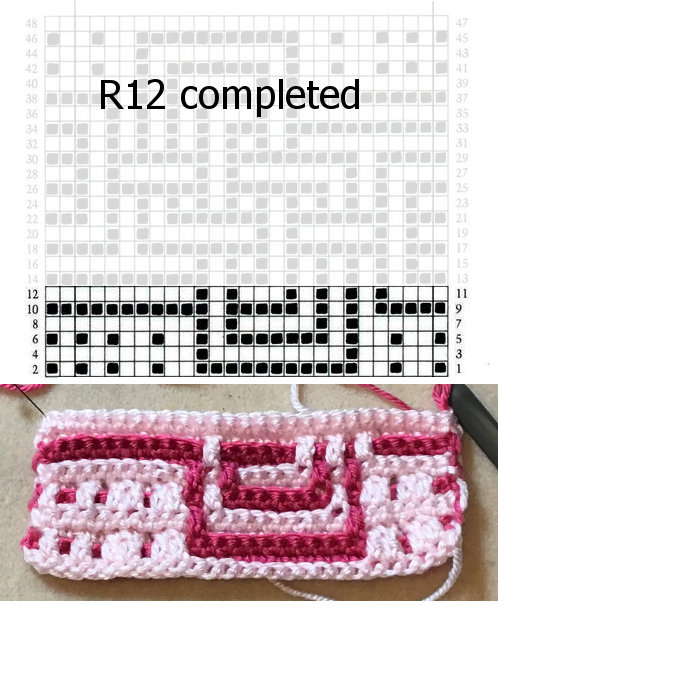
Just follow the instructions as above and you will see the magic of mosaic crochet appear beneath your very fingers! Below, you can see I have finished up to R12 so you can see how it is turning out …
Notes on General Mosaic Crochet
- In case you haven’t already realised, the reason why each sq-row is made up of 2 rows of crochet, per colour, is so that the colour can go one way and come back again, ready for you to pick up the second colour. This is true for flat crochet (where you go back and forth).
- In circular crochet, you only need one row per colour. That is because at the end of one row, you are back to where the other colour is waiting for you. This is very convenient for circular crochet and the graphed patterns will turn out more compact.
- Compact Mosaic Crochet: If you are working in flat crochet, to decrease the height of your Mosaic Crochet and to create a more compact pattern, you [sl.st BLO] in every Even row (rather than [sc blo] as we showed here.
 Please feel free to leave your comments in the comments box below. Or sign up for our free email updates, sent out only when I have new articles.
References:

Is this the crochet method that leaves flaps on the back? If so is there a way to stop that? I prefer my blankets to be smooth on both sides.
Hi Helena, I am a member of mosaic crochet group in facebook and I saw some mosaic crochet blankets had the same picture/pattern in the backside in opposite colors, but when i tried mosaic crochet the backside was just lines of the main color and alternate color. Can you please explain? TIA
Hi there Maiden, I too was once a member of a (the) fb mosaic crochet group… till they kicked me out. But that’s another long story.
I too saw a MC (mosaic crochet) blanket that had pattern rather than lines on the “WS” (wrong side). However, that lady explained that she actually made a DOUBLE LAYERED blanket! — 2 pieces which she then joined the together.
Apart from that, I have not seen anyone making a MC piece that doesn’t have the standard alternating lines/rows of colours on the WS. Maybe someone has devised a way but unfortunately, I have not come across that. Do let me know please if you find the method; I would be interested to know too.
Addendum:
Ooops … I just thought of something else. If you refer to my article “Mosaic Crochet – the Differences” where I mention one of the different MC methods called Spike or Drop Stitch Mosaic Crochet (https://www.clearlyhelena.com/strong-crochet-strap-how-to/), … that method will sometimes (depending on the stitches you use) give you something other than the typical horizontal lines on the WS. That way might be of use to you?
I also mentioned Lily Chin and you can find more about her technique (which she simply calls Mosaic Crochet but which I label Spike or Drop Stitch MC) if you do a search for her on YouTube.
Good Luck!
I have a question: Are there NO CHAINS AT ALL IN ROWS 1 & 2, like with regular mosaic crochet? I thought I had this figured out (I followed along and crocheted the regular mosaic from your previous post), but now I’m confused – At first, I thought that maybe we don’t need the chain sts in rows 1 & 2 (black sq1) because we’re using Front Loops to connect double crochets from higher rows, BUT, it looks like there might be chain sts made in higher rows.
I was going to crochet along with your directions here, like in your post about regular mosaic crochet, but I’m unsure of whether to put chains in rows 1 & 2 – the photo looks like it is all sc’s, but it might not be, as it’s hard to tell, but it looks very different from the photo of Rows 1&2 in the previous post, and in this post, you wrote, “If this is going to be a black sq-row, then crochet the 2 rows in [sc in BLO]….”
So, I don’t know if you mean that LITERALLY, as in ALL sts are SC blo, (if so, then that defeats the purpose of chart except for which color to use) or if you mean that all sts besides chain sts are sc blo, or if you mean all sc’s are blo.
In the meantime, I am going to try to work it with chains and without to see what happens. Thank You very much!
UPDATE: I figured it out. Applying the rules about chains in the overlay method made no difference in the sample I made compared to my regular mosaic sample, except it looked slightly different because of being done in blo. It did not work until I made the 1st sq rows all sc. (I previously thought you might’ve been referring to all of the (regular) sts (“sc”) and just did not mention the chains.)
For some reason, I was assuming that I needed to apply the rules for regular mosaic crochet to Overlay mosaic crochet, and I was assuming that there must be chains involved like normal Overlay crochet where there’s usually chains that are worked into from rows above, and that coupled with wondering why the first sq rows were all single crochet, I was thrown off.
Thank you very much! Also, thanks for the link to the MM CLTFBC/PCIC Foundation technique! I can’t believe I’ve never heard of that before, it’s AMAZING! I will never go back to using foundation chains or any other chainless foundation technique again! It makes the PERFECT foundation, is easy, neat, & stretchy! I don’t usually use other chainless foundation techniques because my sts lean so much, but with the CLTFBC/PCIC method, they are perfectly straight! Thanks Again!
Hi there!
1) SORRY! I just can’t keep on top of the admin, comments, and feedback sections of my site. Sorry. I just saw your question and comments.
2) Bravo! Congrats! Glad you worked it out. I have also included, explicitly (thanks to your comments) that we don’t use any chain-spaces in this Overlay Mosaic Crochet Method.
Thank you for dropping by!
Thanks for replying! I really love your tutorials! Thank you so very much!