How to Mosaic Crochet: I have already talked about How to Read Mosaic Knitting Charts. So today, let’s do the same for crochet.
Please note that while this MC (Mosaic Crochet) tutorial is still valid, I would actually strongly recommend other methods of MC. I have written tutorials on these other MC methods which are very much easier to do and understand. In order of preference:
In Mosaic Knitting vs Mosaic Crochet, I showed you the differences between the two outputs. And I already talked about the confusion over what is mosaic crochet. And because there is some confusion, let me be clear here as to what I mean when I say Mosaic Crochet.
My Definition of Mosaic Crochet
To me, Mosaic Crochet is .. the equivalent of Mosaic Knitting, in crochet form.
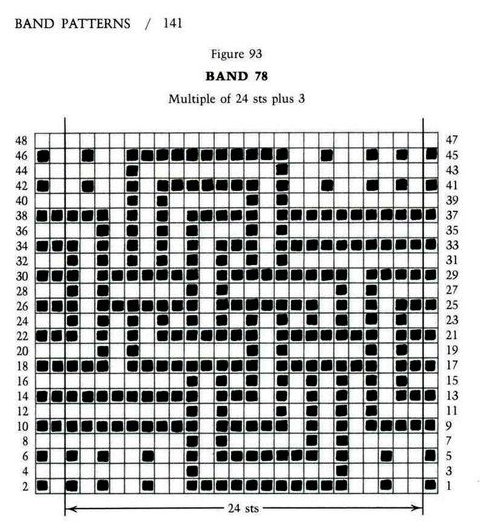
Basically that means, one should be able to crochet off a Mosaic Knitting chart. Barbara Walker, the clever lady who first coined the term “Mosaic Knitting” has a whole collection of charted patterns. You can also create your own of course. And without doubt, knowing how to work off a visual chart is much, much easier than working off rows and rows of text.
Another significant feature and attraction of Mosaic Knitting and Mosaic Crochet, is that you can work in colours without having to change colours mid-row.
I really dislike reading text-only instructions. And I really like working off visual charts. So that is what we are going to do here.
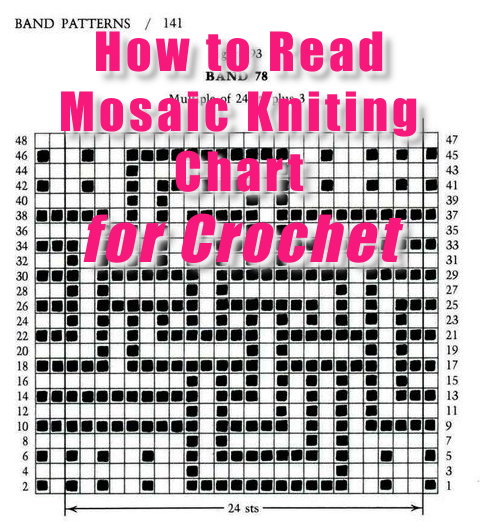
How to Read Mosaic Crochet Charts
Note: I am going to use a Barbara Walker Mosaic Knitting chart (the same chart used in How to Read Mosaic Knitting Charts), but now we will be crocheting.
Foundation Row: R0 (zero)
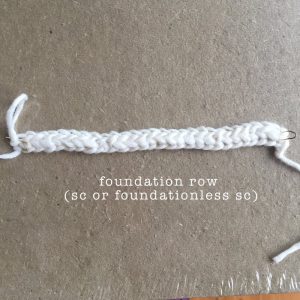
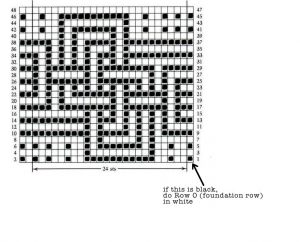 Even tho it is usually not shown on the chart, we always start off with one foundation row of sc (single crochet).
Tip: you can also do the foundation row with a row of Foundationless Single Crochet or with my favourite: MM Foundation Row.
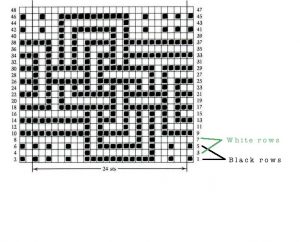
If the starting square is black, then the foundation row (R0) will be in white.
Reading Directions
R1 & all odd rows (RS) – read from right to left
R2 & all even rows (WS) – read from left to right (But really, you won’t need to read on even rows. As I will shortly explain)
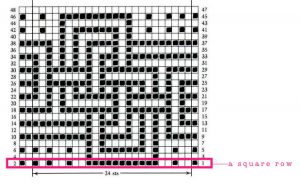
A Sq-Row is a Row of Squares – representing 2 rows of work.
A sq-row is a Row of Squares. And each sq-row represents 2 rows (worked in one colour). (R1&2; R3&4; R5&6; etc.)
Identifying Which Colour per Sq-Row
The right-most square of each row of squares on the graph, identifies the colour you will be working with.
Tip: I don’t have to say you can substitute the B/W shown with any colours of your choice, right? And that you can change that duo colour combination at any row. I am sure you realise that already, right?
Reading the Sq-Rows
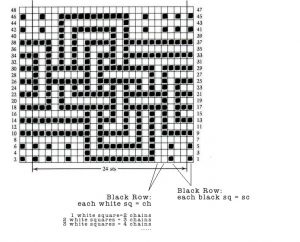
Let’s start reading the chart. Starting at the bottom-right of the chart.
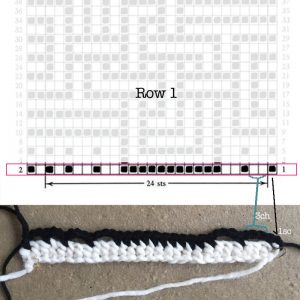
- Black Sq-Row (R1&2):
R1: Whenever you see a black square, you sc (single crochet).
When you see a white square, you ch (chain).
Note: When chaining (to prevent puckering) –
1 sq = 2 ch
2 sq = 3 ch
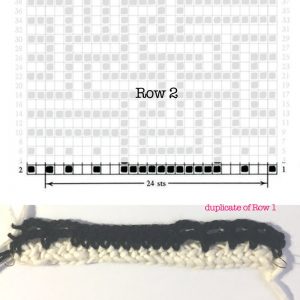
3 sq = 4 ch, etc. - R2: Then on the next (even) row (still in black), you do exactly the same. You sc every black stitch and chain (the same number of chains) as per previous row.
Take Heart!
The next part will seem a bit complicated. But stay strong! I promise you that the written text only looks more complicated. But when you do it, it will be much easier. So I strongly suggest you actually crochet along and it will become much clearer. And easier!
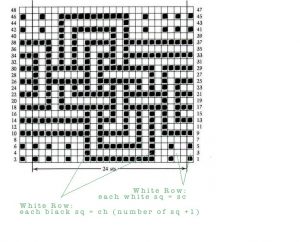
- White Sq-Row (R3&4):
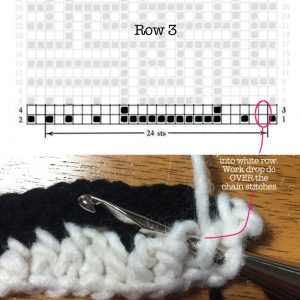
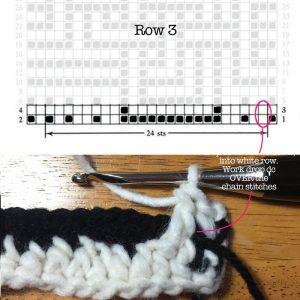
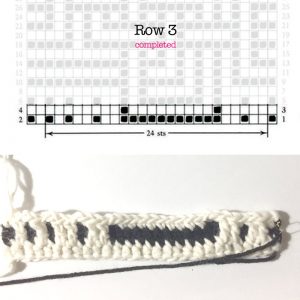
R3: On the chart, whenever you see a white square over black [White/Black], you sc.
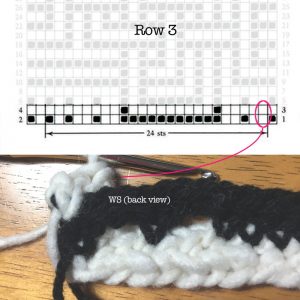
But on the chart when you see a white sq over a white sq [White/White] (it will actually be over black chains on your work) you drop-dc down 2 rows (into the row of the same colour as the working yarn) and IN FRONT OF the chains below.
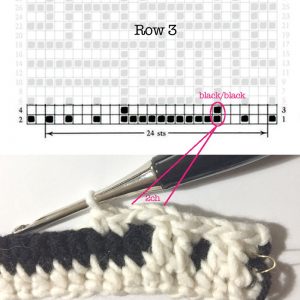
And on the chart, where you see black over black [Black/Black] (remember, we are doing a White sq-row), you will chain.
1 black/black sq = 2ch
2 black/black sqs = 3ch
3 black/black sqs = 4ch, etc.
- R4: Then on the next (even) row (still in white), you do exactly the same. but in sc & chains. You sc every white stitch and chain (the same number of chains) as per previous row.
Note: you will have noted I am sure that on all the even rows, you don’t need to refer to the chart at all. Just follow the colours as per previous row.
Hereafter, for every sq-row, you just need to follow the same procedure as you did in R3&4.
And that’s all there is to Reading Mosaic Crochet/Knitting charts!
Addendum 1 Oct 2020
In response to a query by Christine Nagel in the comments, I am writing my response here in case someone else has the same query. And also because I am, for some reason, unable to add an image to my response.
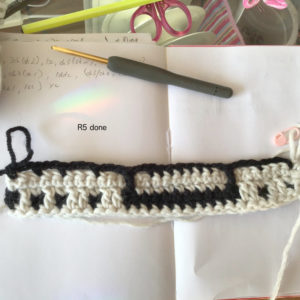
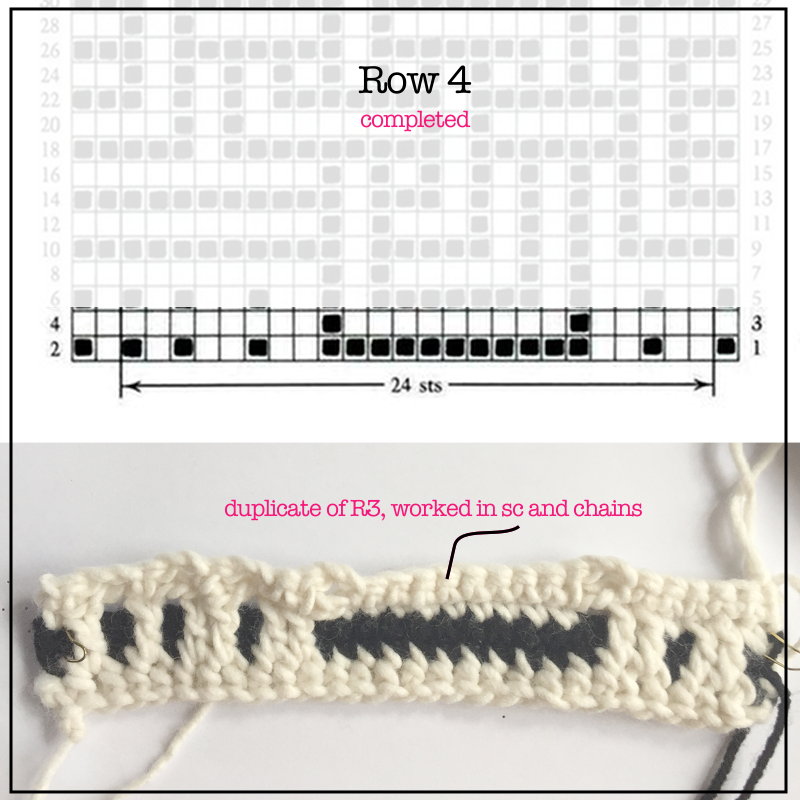
R5: (1sc, ch3/sk2) x2, 1ddc, ch2/sk1, 7sc, ch2/sk1, 1ddc, (ch3/sk2, 1sc)x2, (ch2/sk1, 1sc)
This is what it should look like at the end of R5:
 But really, what is more important that I want to point out to you is that this was my first Mosaic Crochet tutorial. Since then I have added other methods of doing Mosaic Crochet. Please see addendum notes that I have added to the start of this article.Hope this helps. Good luck!
Tips & Observations on Mosaic Crochet
- Every even row is pretty much a repeat/duplicate of the previous row. So that might be a good time to count your stitches to make sure your number of stitches are still correct. It can be quite easy to lose/add a stitch on the previous row accidentally.
- Though I hate to say it, as I prefer crochet over knitting at most times, reading the charts for crochet is much harder than it is for knitting.
Harder to read Chart for Crochet
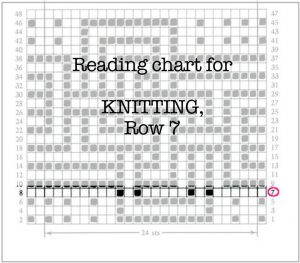
When using these charts for Mosaic Knitting, it is very easy. You basically keep your eye along one (odd) row as you knit. Say, for R7, you just focus on that one sq-row.
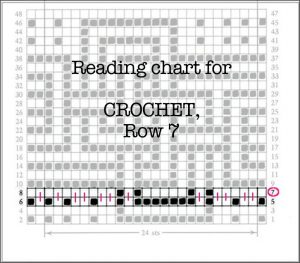
However when you are reading the chart for Crochet, you need to focus on TWO sq-rows :- Row7 that you are working on, AND the previous sq-row.
That is because you have to concentrate on where to do the drop-dc stitches (I have marked them with pink vertical lines below).
And on the even rows, it is also easy to see how many slip-stitches you have (made on the previous Knit row). But it is harder to see how many chains you Crocheted in the previous row.
Nonetheless, once you get used to reading these charts for Crochet, you will find, as I have, that it does get easier. I promise!
 Please feel free to leave your comments in the comments box below. Or sign up for our free email updates, sent out only when I have new articles.
Feedback
I received this feedback from a lovely reader, Darlene, who was not able to use the comments box from her tablet. Darlene has given me permission to post her comments here and I do so coz it mades me so happy whenever I hear that what I blog is of use to someone. Thanks Darlene!
“Thank you so very much for your article/tutorial for mosaic crochet charts! I had found a wonderful pattern to make as a gift, but could not make heads or tails out of the chart. Your tutorial was so well written and easy to follow, I was not only able to figure out how to read the chart, but now I can work directly from the chart itself (without needing to write everything out first)! Not only that, but thanks to you, I can confidently work from knit mosaic charts as well – which is really awesome, since there are really so few mosaic patterns written for crochet. This has totally opened up a whole world of possibilities, and I can’t thank you enough for taking the time to write this tutorial! Love and blessings to you and yours, Darlene
Message to Commenters
Today is 1 Sep 2020 and I have just had time to look at many of the comments. I am very very sorry. I confess I have a hard time checking in on comments coz so much is going on. No excuse I know but apologies all the same. I have just answered as many comments as I could but I have left unanswered, those from 2019 and earlier. Sorry.
References:

I am pretty new to mosaic crochet with only 3 projects (all afghans) under my belt, although two of them did include a double border, so they were not super basic. Is there a way to modify an existing mosaic overlay chart that is supposed to be worked in the round into a chart that can be worked from the bottom up? When I tried to duplicate the “round” pattern on stitch fiddle it looked fine but when I crocheted it the top half was taller/longer than the bottom half—which someone suggested was because the DCs would be worked in 2 different directions when working in the round. For me the working in the round is way too fiddly and the resulting “cloth” seems a bit uneven and flimsy and rough/crude. Could be I am just a clumsy novice, but I prefer the bottom up method. TIA : )
Hi Helena. I’m trying to teach myself mosaic crochet and this explanation works well for me until I get to row 5. It seems to read, sc, drop dc x2, sc, and so on but I can’t make that work. My first video 4 rows look exactly like yours but after that, I can’t figure it out. Am I not reading the chart properly? My brain hurts!
Hi Christine, I have added to my tutorial in response to your query by writing out R5 for you. Please see R5 in the article itself. I could not include an image in this comments section. I hope that will help with the painful brain!!!
I think I get it now. I just have trouble with counting the stitches to skip. They include chains or only sc? And sometimes the ddc seems to be worked into a ch 2 rows down?
I can’t believe I found this. I have been mosaic knitting and crocheting but I knew there had to be a way to turn all my mosaic knitting charts I have into mosaic crochet. I have used them in tapestry crochet but that really makes for a heavy piece. Thank you and I can’t wait to try some.
Hi! Thank you for your comments. Very glad that this has been of some help. 🙂
Hi, I am missing something… Do you turn your work every 2nd row to get back to the right side or do you cut off the yarn and begin with the right side every time??
You turn. Like you would in normal crochet. The 2rows method, turning at the end of each row, is just so you can bring the colour back to the RHS (right hand side). That too is the reason why you cut yarn (in the other variation of mosaic crochet, often called for the wrong reason, Overlay Mosaic Crochet) … so you can get the yarn to start on the RHS again.
The pattern for a snowflake square pattern i am making instructs me to “carry the yarn along the side”. Is there a way to hide the yarn you are carrying at the edge so that it does not show on the wrong side? I am using strongly contrasting colors and don’t like the look of the loops that remain even after I put a border on the squares I am making. Thank you!
None that I specifically know of. The best one can do is make it as neatly as possible. Also double layered borders are very good but I know that is not always possible or appropriate for the project.
Nagyon köszönöm ezt a részletes leírást! Már régóta kerestem, hogyan lehet síkban (oda-vissza) horgolni a mozaik mintát. Köszönöm, hogy megmutattad a mintáról való olvasás fortélyát!
Thank you very much for this detailed description! I’ve been looking for a long time for how to crochet a mosaic pattern in a plane (back and forth). Thank you for showing me the trick to reading about the sample!
Ágnes, thank you for your feedback. You are most welcome!
Thank You so very much! The way you explained how to read the chart (which, is actually how to covert a chart too, and ALSO, your instruction gives us what we need to how to make our own charts) is excellent! You put A LOT of thought, time, and work into this, and I greatly appreciate it, I have never seen a tutorial like this for mosaic crochet!
My first experience with mosaic crochet was before I’d ever heard about it, I was playing around with a granny square, I had 2 colors going and I was weaving the stitches in a way that made some interesting patterns when I kept repeating the way I was doing it on every round, but I didn’t understand what I was doing, so I could not “plan” a certain look, and I did not know how to create other patterns and I was flustered. I knew there must be a way to make patterns, but I couldn’t figure it out, and I never thought it could be charted like this! NOW, with your instruction, I understand how it works!
Thanks Again!
Hello Anna, thank you so much for the feedback. I am overjoyed that this was of help to you. Yay!!
i did not understand what you meant by sc in the black boxes and ch in the white , can you explain further . Also do you have a book to show patterns and if so how do i buy it. thanks
Hi Charline, I think what you are referring to refers to a “black row” along which, whenever you see a black box/square/cell, you sc (single crochet) and when you have a white sq, you will work the appropriate number of ch (chains) – viz you do not work into the white square when you are using a black yarn.
The first and most famous book for mosaic patterns is by Barbara Walker (even though that was for knitting): Mosaic Knitting
What do I do when I have 3 or 4 rows that start in the same color? If every first sq defines the color of the row…how do I make the pattern with one color?
3 or 4 rows that start in the same colour? You either need to create a “selvedge” (one extra sq on the right; 2 extra sq on the left) as shown in all mosaic knitting/crochet charts or you are crocheting something that is not meant for Mosaic Crochet. And if you are making a pattern with one colour, then Mosaic Crochet is not the right technique for the project. It would be like doing a tapestry knitting in one colour, if you know what I mean. Sorry.
That was very helpful, thank you ❣️
Thank you Sara!
I’m afraid to say that I never understood a word of that explanation!!
Sorry Patricia. I tried my best.
Thank you so much for this! Very clear and well-explained. It’s made my current mosaic crochet project so much quicker to work through by just referring to the chart, makes it a little too quick – I do the stitches almost without realising because it’s so much quicker and easier. Thank you thank you!
Yay! Thank you! If you haven’t read it yet, you might want to look at my new (improved technique and tutorial) – the Overlay Mosaic Crochet method – which, despite misconception, can be worked over one (and cut) or two rows (no cut). Much easier mosaic crochet and my current fav way of doing mosaic crochet.
This looks like a very interesting technique. I definitely want to give it a try. I’m a bit confused reading through this directions but I’m sure once I have my yarn and hook in hand it’ll make more sense. Thank you for sharing your tutorials and the clear photos to show exactly how to follow along.
Hi Coleen, sorry I have not been monitoring my site for a long time. For various reasons. I hope by now you would have have a chance to try this and found it clear enough to follow along. FYI: I now have an improved and easier method – Overlay Mosaic Crochet which you might like.
Is it possible to use dc instead of sc, mosaictc
Instead of mdc, so that the work could be finished faster ?
So what do you do in a white square row when it’s a black square over a white square?
I have been able to Knit Mosaic knitting for many years, but have never known that it could also be crocheted. With the help of your tutorial I will definitely be giving it a go.
Hi, thank you for this. I am very interested in trying this out. Do I just drop one colour and pick up the next one every 2nd row then? What if you used more than two colours (or is this not possible?) Thanks!