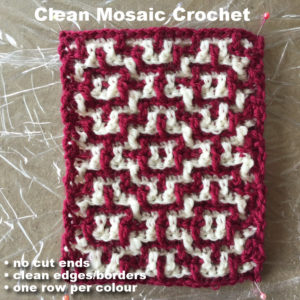
I call this the Clean Mosaic Crochet method because it is truly clean in a number of important ways. We do away with the pesky cut yarns at the end of every row that is typical in the overlay mosaic crochet method. We do away with the boring second row in the 2-row Chain-Space MC method (also known in places as the Inset method). And as a added bonus, we can have a clean border edging: you won’t see the yarns being caught and brought up along the edges.
BENEFITS OF CLEAN MOSAIC CROCHET
- 1 row per colour,
- NO TAILS – no need to start and cut the yarn for every row
- SAVE TIME & YARN – no need for double layered borders or other means of dealing with yarn tails
- NO UNSIGHTLY EDGES – no need to carry up unsightly yarn along one edge as in the 2-row method. (Chain-Sp Method aka Inset Method)
- AUTOMATIC BORDERS – create neat borders (of any width) along sides as you work; all of a piece
So let’s get to the tutorial immediately … or rather after I set out some clarifying notes so we are all on the same page.
Terms & Conventions Used
I will be using what will initially seem to be some tricky manoeuvre. So to ensure we don’t get confused and that I can explain all this as succinctly as possible, I will define some conventions I will be using consistently henceforth.
Let’s recap….
MC Graphs/Charts
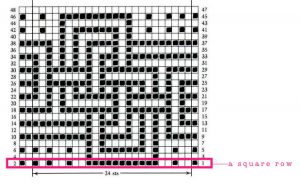 They normally look like this and the pattern is charted in square-rows.
Right Side (RS) vs Wrong Side (WS)
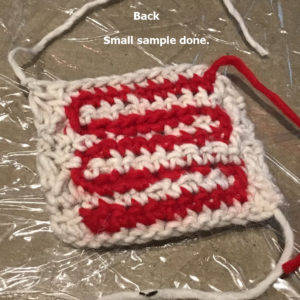
There is usually a distinct Right Side (RS) and Wrong Side (WS) to your work. The RS corresponds to what you see on the chart; the WS normally looks like stripes of alternating colour.
Fixed Right Edge (RE) vs Left Edge (LE)
To minimise confusion, with the RS facing you, I will refer to the right edge as the Right Edge (RE). For our work, this will not change. That means that even when you turn the work so that the WS faces you, I will still denote RE as the right edge when the work was facing Front-up.
Similarly, LE (Left Edge) will always refer to the edge of the work that is to the left when the work RS was facing you.
Fixed Front Loop (FL) vs Back Loop (BL)
If you are already familiar with the popular Overlay Mosaic Crochet, you will remember that we always work sc (single crochet; US terminology) in BLO (back loop only).
Generally, what is front loop or back loop depends on whether the RS or the WS of work is facing you. That can get very confusing. The distinction between front loop and back loop will become particularly important here so I will define what I mean very clearly.
Back Loop (BL): for our purposes, Back Loop (BL) refers only to the back loop of stitches when the RS of work is facing you. That means that even when you turn the work around and the WS faces you, BL will still mean the back loop of stitches when the RS of work was facing you.
Front Loop (FL): similarly, FL means the front loop of stitches when the RS of work is facing you. This will be fixed – FL is the front loop of stitches wrt to RS of work facing up.
And as a helpful work mnemonic, keep in mind that:
Front Loops are Sacrosanct.
Work all SC (single crochet) in BLO, unless otherwise stated.
You never work sc into FLs. You need to keep them free so that stitches can be overlaid over stitches and worked/dropped into the FLs to form the Mosaic Crochet patterns.
Recap: Chain-Space MC (aka Inset MC) Method
In this method, each charted sq-row usually requires you to crochet each yarn colour for 2 rows (to and fro). So that the yarn starts and ends on the RE of the work. This is usually a waste of time and yarn where the creation of the designed-pattern is concerned.
FYI: You can refer to Mosaic Crochet – How To; my first mosaic crochet tutorial if you would like to learn how to use the Chain-Space MC method (aka Inset method).
Recap: Overlay MC Method
Tho it is not true (as I explained in Overview of Mosaic Crochet), many people think that with this MC method, while they can work each charted sq-row with just one pass of each colour, they have to cut the yarn at the end of the row – leaving them with a lot of cut ends to be dealt with at the end of the work. Again the only reason why the yarn is cut is so that we can start each colour on the RE, with RS facing up.
FYI: You can refer to How To Overlay Mosaic Crochet, if you would like to learn how to use the Overlay MC method .
Now let’s jump into our CMC tutorial so I can show you how you can just achieve the benefits of CMC.
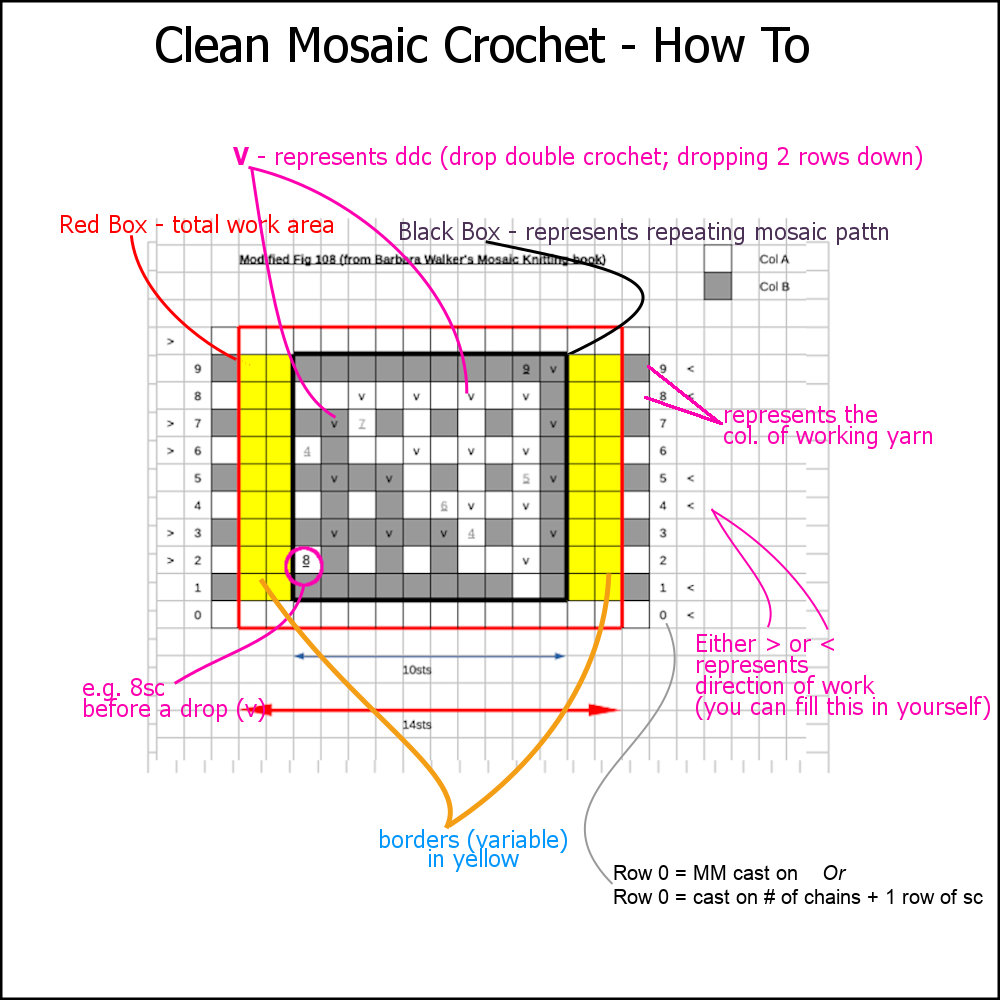
Clean Mosaic Crochet – How to Read the Chart
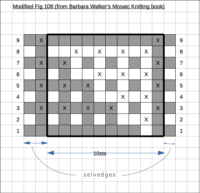
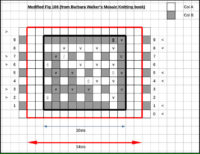
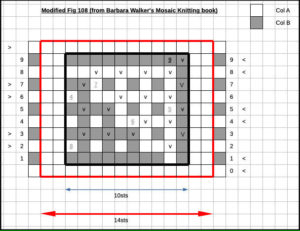
To be consistent, we will use this mosaic chart that I alreadty used for the various samples in Overview of Mosaic Crochet – the Differences.
But I will make some further clarifying notations for our CMC method.
Ok Ok! Before you moan and groan and turn away from a deceptively complex illustration, just spare a moment to think about me and what I had to do to put this together for you!!! And let me assure you, for you, it will be all quite simple – I just crammed a lot of info here. But once you get it, it will be easy peasy!
With reference to the graphed mosaic pattern above:
- each colour represents 1 row of the chart
colA/colB: in CMC, as in all mosaic crochet, you work with 2 colours at any one time even though you can change what colour(s) colA and/or colB represents at different places in your work.
Inner & Outer Yarn: in CMC, one of these two colours is also assigned as an outer yarn and the other as inner yarn.
The inner yarn is never worked right to the edge.
The outer yarn extends past where the inner yarn stops; the border is worked in the outer yarn colour.
Borders (represented by the yellow section on the sides in this example): The border is worked with the “outer yarn” which is worked to the full width of the work. You can decide which of the two colours will be your border. Or the pattern in hand may determine that. The very first row (Row 0) will usually also be the border colour.
My borders are worked in LDCs/Linked Double Crochet (for a denser border though you can use ordinary dc/double crochet too). They can be worked through both loops (i.e. front & back loops).
Row 0 (Foundation Row): If you are starting your work with my favourite cast on (the MM Cast On), then cast on and Row 0 are one and the same.
If you are using the conventional cast on with specified number of stitches, then Row 0 = 1 row of sc (single crochet).
2ch up: for every row that starts with an “inner” yarn, remember to make 2ch to bring it up to level with previous row
Black Box: the repeating mosaic pattern is encapsulated within the black box.
(Note that sometimes I might not have repeating patterns. In that case, you might not see a black box in my patterns.)
Outer Box (red in this example): total work area, including borders on each side. (Borders can be any width. In this graph example, it is 2 stitches per side.) One of your 2 colours (the “outer yarn”) will form the borders and will be worked the full width of the outer box.
Inner Box (black in this example): patterned area, excluding borders. Coincidentally in this example, the Inner Box = Black Box.
If I was doing a wider sample, for example, a total width of 34 stitches {i.e. 2 + (10×3) + 2 }, then the Inner Box would be 30 stitches while the Black Box (to represent one set of repeatable pattern) would still be 10 stitches wide.
On Graph: Alternating Coloured Squares Along the Sides (next tot he row numbers): indicate the active yarn colour you will be working with, row by row.
(This is a standard Mosaic Knitting&Crochet graphed-pattern convention.)
Left/Right Arrows ( < and > ): when I chart out a pattern, I often add the left/right arrows along the edges to indicate direction of reading and working for that row. The arrows are not an essential part of a Mosaic Crochet chart but are very helpful.
I normally apply the following rule of thumb:
> is when the WS of the work is facing you, and you read the graph from left to right.
== with RS facing you:crochet one row of Col A from RE to left. Then you..
crochet one row of Col B from RE to left.Followed by …
== with WS facing you:crochet one row of Col A from LE to right. Then you..
crochet one row of Col B from LE to right.And so on.
Numbers in the squares: they are numeric counts (e.g 31sc, or 7v) which is entered in the the first square of a span of squares along a row, in the direction of read/work (border stitches are NOT included in this count).
“V”: This is used to indicate ddc (dropped dc). This is another aid to help make reading the MC charts easier.
If you are used to Tinna Thorudottir Thorvaldar’s mosaic crochet and her charts, you will be familiar with the “x” in her charts which is used to indicate where you will apply the ddc (dropped dc). I started with that as well but soon found that the “x” can get confusing over time as “x” is often used as a universal crochet symbol for “single crochet”. So I have used “V” instead to indicate where you will apply a ddc. And the “v” also visually reminds us that we are lowering or dropping a stitch into a lower row.
Please note: I am manually entering the “v” and the counts (numbers) as an additional, optional aid only, for your convenience. It is not an essential part of the chart pattern. Even if I do not do that, you will want to be able to use and work with mosaic crochet/knitting charts without those “v”s being filled in and/or the squares being counted for you. The basic rule is that if you are working in Black and White, for every White row, wherever you encounter a W / W (white over white) square, that is where you need a “v” (a ddc stitch). Same logic with Black rows: wherever you encounter a B/B sq, you need a ddc.
See, that wasn’t too hard, was it? Now that you know how to read the CMC charts, let’s dive into our tutorial.
TUTORIAL: Clean Mosaic Crochet Tutorial
Refer to the charted pattern as we go.
Per example:
colB = red
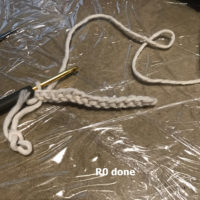
R0/col A (RS): 14sc (If you are using my fav cast on: MM Cast On, then that counts as R0.) Insert a marker into the last loop to prevent it from unravelling. You started on the RE (right edge); ended on LE (left edge).
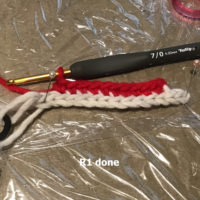
R1/col B (RS): Start col.B. Start on RE, 2 stitches in.
10sc. Leave loop on another marker.
Yup. You will only work col.B within the Black Box (or repeating pattern) of the chart; it will not be part of the “borders”. This is how we avoid having to carry up the inactive yarn colour along the edges.
R2/A (WS):
Note: WS will be facing you.
Work left to right, according to chart.
Place all non-working yarn to WS of work.
Start & end with 2dc for borders.
Remember that all sc are work in BL as defined above. “Front loops are sacrosanct!”
Opt. You don’t have to but I work all my border in LDC (Linked DC)
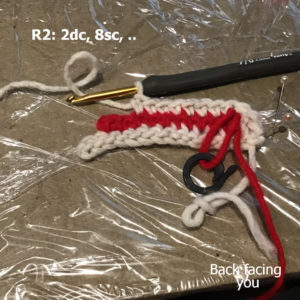
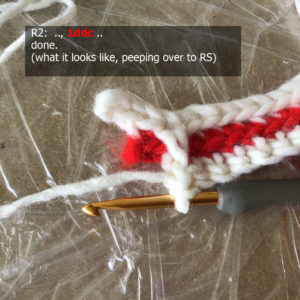
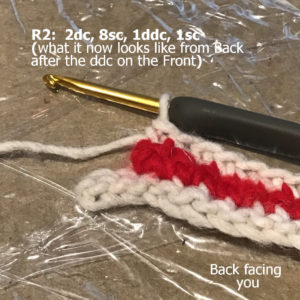
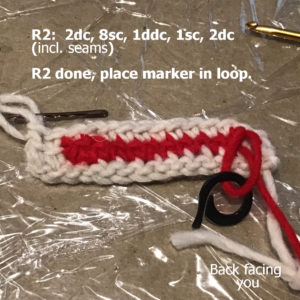
2dc, 8sc, 1ddc, 1sc, 2dc
Important Trick #1!
Updated: 18 Nov 2020
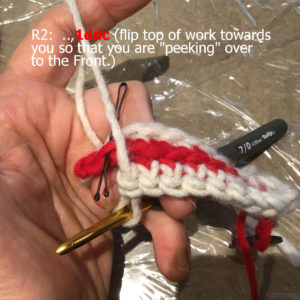
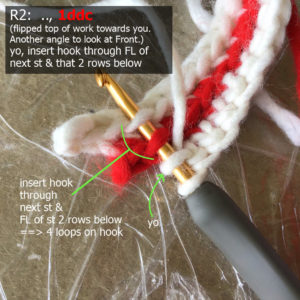
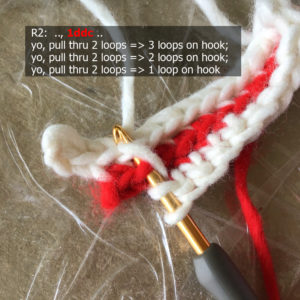
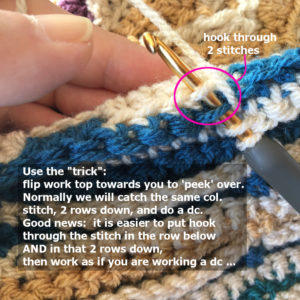
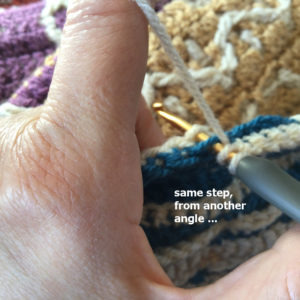
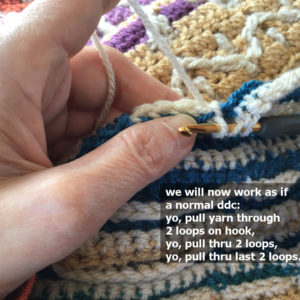
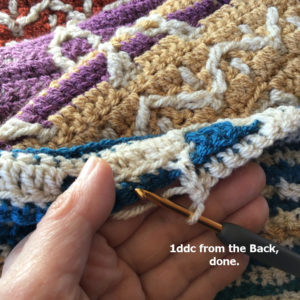
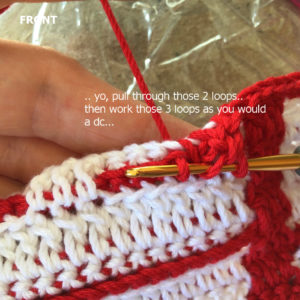
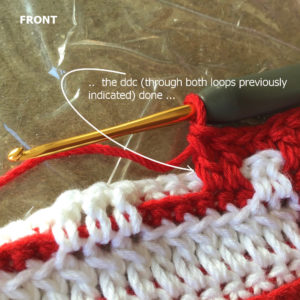
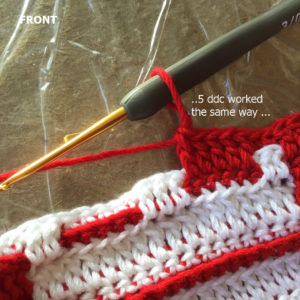
As we are working with WS of work facing you, I want you to take particular note on this trick of how to work a ddc from the WS but applying it to the RS of work.
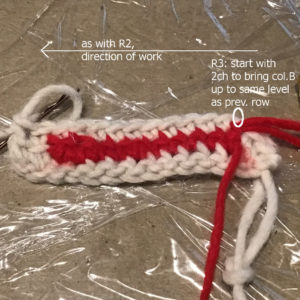
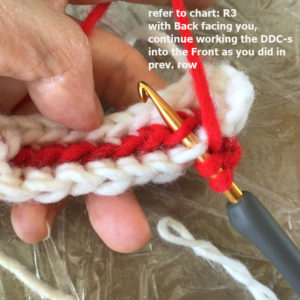
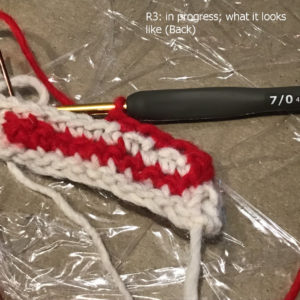
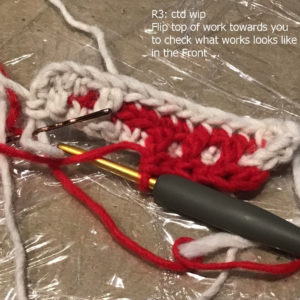
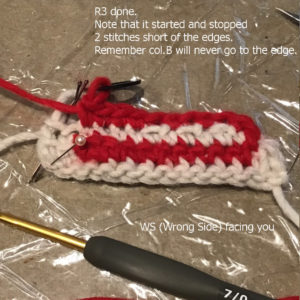
R3/B (WS): (Note: we are still working in the same direction as the previous row: LE to RE.
Note also that col B is lower than previous row. And that, in this colour, we do not have to do the border. To bring this up to same level, always start B with 2 chains.)
(1sc, 1ddc) x3, 3sc, 1ddc
Here are the photos showing parts of R3. Remember that we will be using the same trick of working ddc into the RS of the work from the WS, as detailed above.
Important Trick #2!
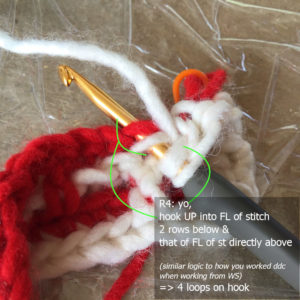
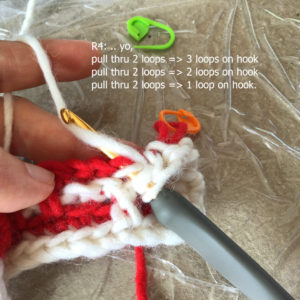
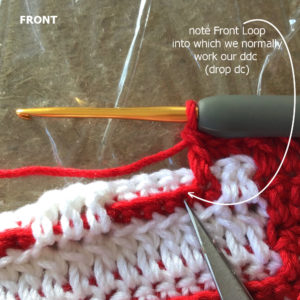
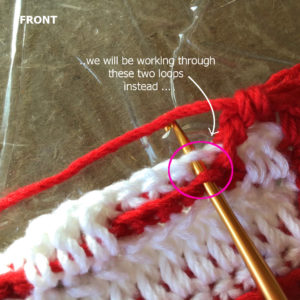
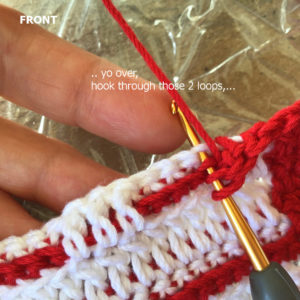
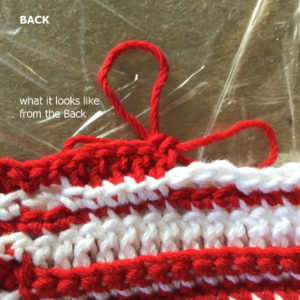
Now, pay particular attention to the trick of working a ddc from RS. This is different from normal. I have added this trick to ensure that there are no floppy strips on the WS of the work.
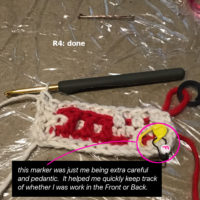
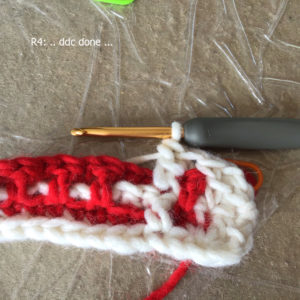
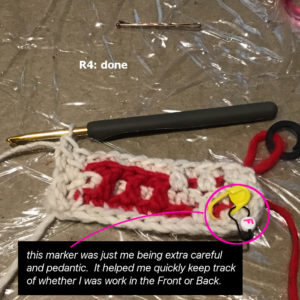
R4/A (RS): carry on following the chart, paying mind to direction of work; when to ddc; how to apply the “ddc into the RS from the Wrong Side” trick. Remember that here, col. B has been designated the inner colour and never reaches the edges while col. A includes the border allowances and is worked in dc stitch for the side borders. (Or Linked dc for a firmer border.)
Keep in mind you work col. A then col.B in one direction,
then col.A followed by col.B in the other direction,
as per indicated in the chart.
R4/A (RS):
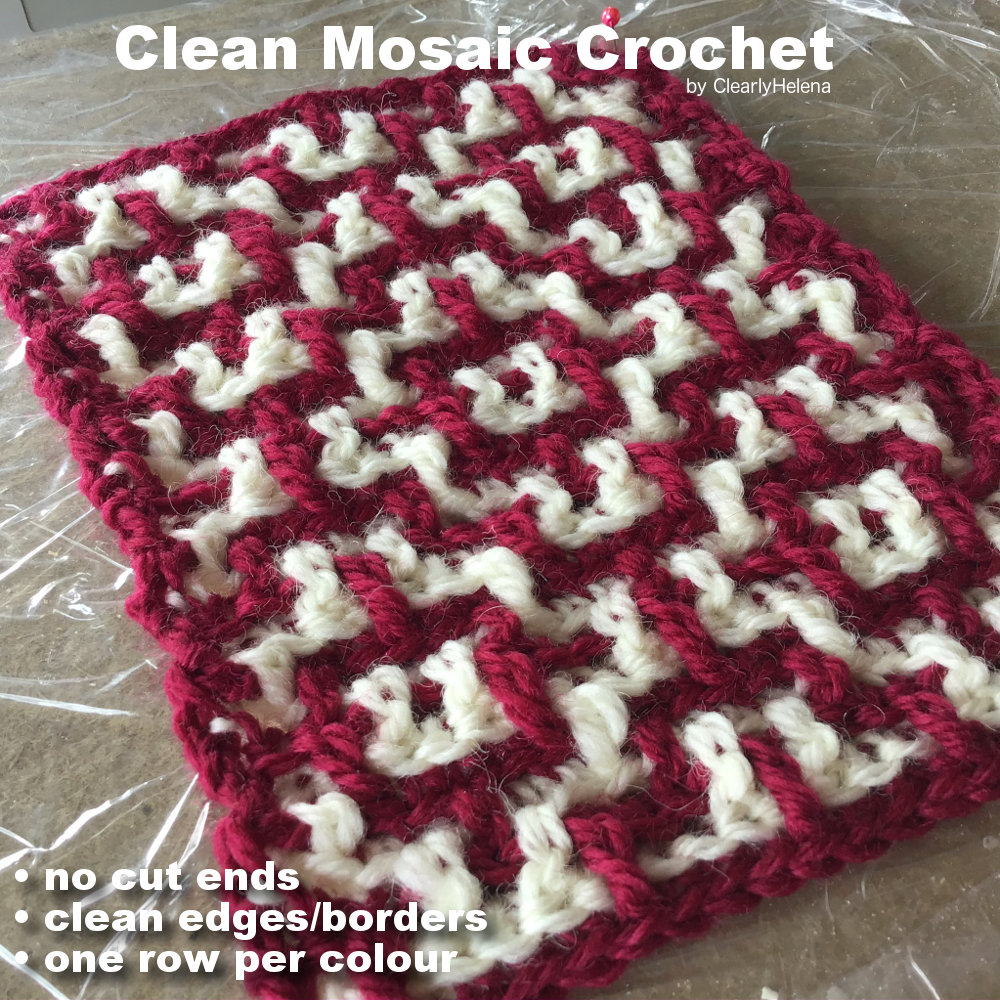
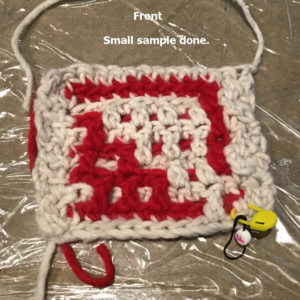
R5-10: you should now be able to crochet these rows, following the chart. Your sample, when done, should look like this below.
Even though I have not tidied up the final ending yarns (and the starting tail), from this small sample, you can already experience for yourself that:
- it is clean – i.e. no pesky cut yarns at the end of every row
- every row counts in forming the mosaic pattern
- and no untidy inactive yarn that has to be caught and carried up along one of the edges
If you found working this method a bit tedious, then I have to agree. I found that too. But only in the beginning. You will quickly acclimatise and I hope that, like me, you will find this Clean Mosaic Crochet method easy and fun to use for any mosaic charted patterns.
Another Sample of CMC
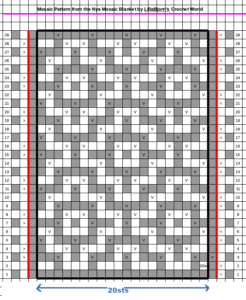
This larger sample shown here is also worked in CMC method. You may recognise it as this is from the famous (free) Nya Mosaic Blanket, designed by the talented Tatsiana of LillaBjorn’s Crochet World site. She used the Chain-Space MC method (aka Inset MC method) – utilising the 2-row routine.
Permission: Tatiana Kupryjanchyk, owner and designer of LillaBjorn’s Crochet World has given her kind permission for the use of her Nya mosaic chart, as shown here.
I wanted to show that that same mosaic pattern can as easily, if not more so, be worked using this new CMC method. Here I worked only a 1-stitch seam/border on both sides. I have only modified LillaBjorn’s Nya charted pattern slightly for this illustration. You can also use the modified chart here for further practice with the CMC method if you want to.
More Advanced Tips in CMC
Once you have mastered the basics of CMC, you might want to consider these tips below.
Tip 1: For a Neater Back (WS)
Updated: 21 Sept, 2020
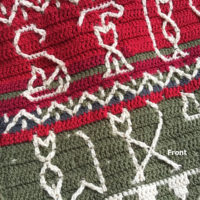
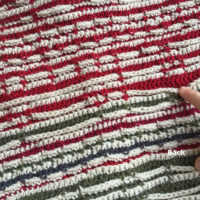
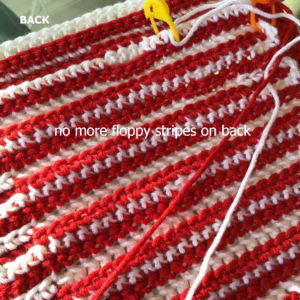
We know that it is normal to have alternating stripes on the WS of a Mosaic Crochet piece of work. There are times when these stripes can look a little floppy. For example, when there is extended stretches of ddc (which means that the back loops are left unused on the WS).
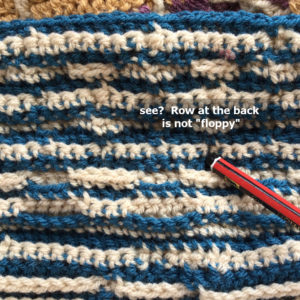
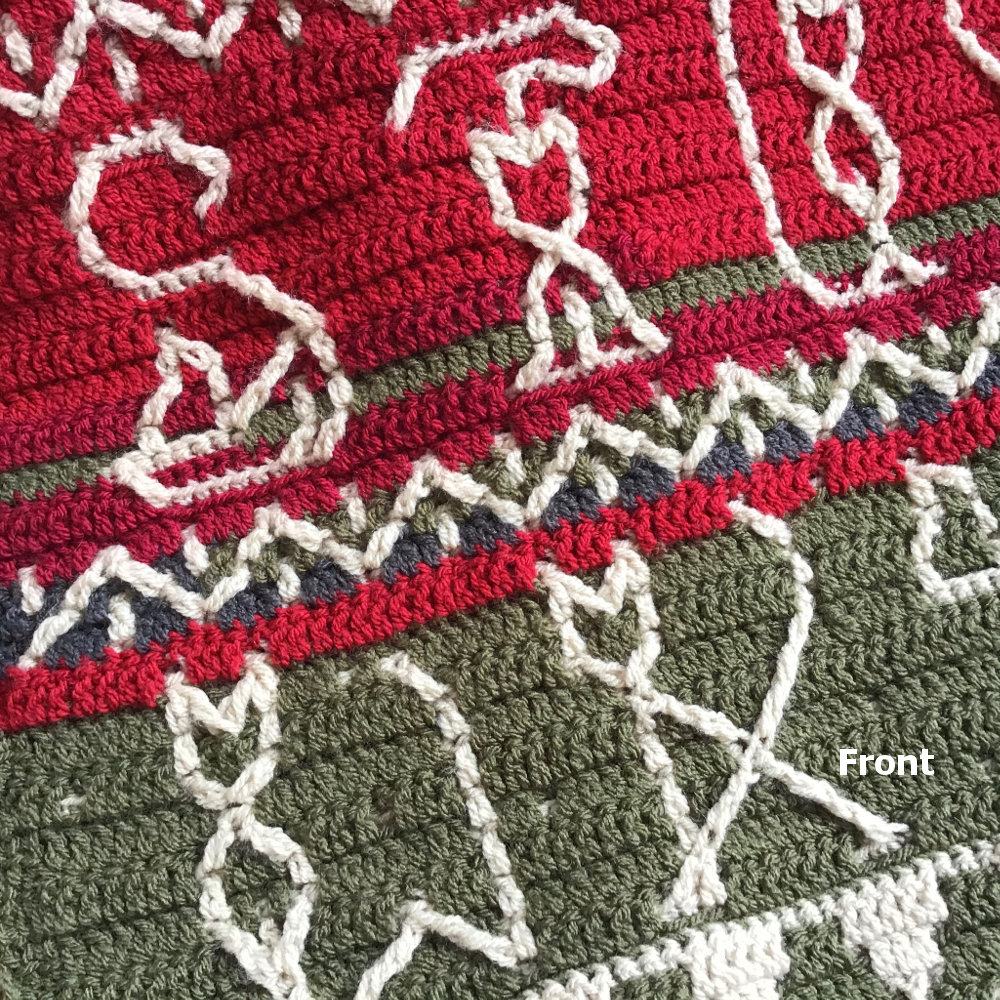
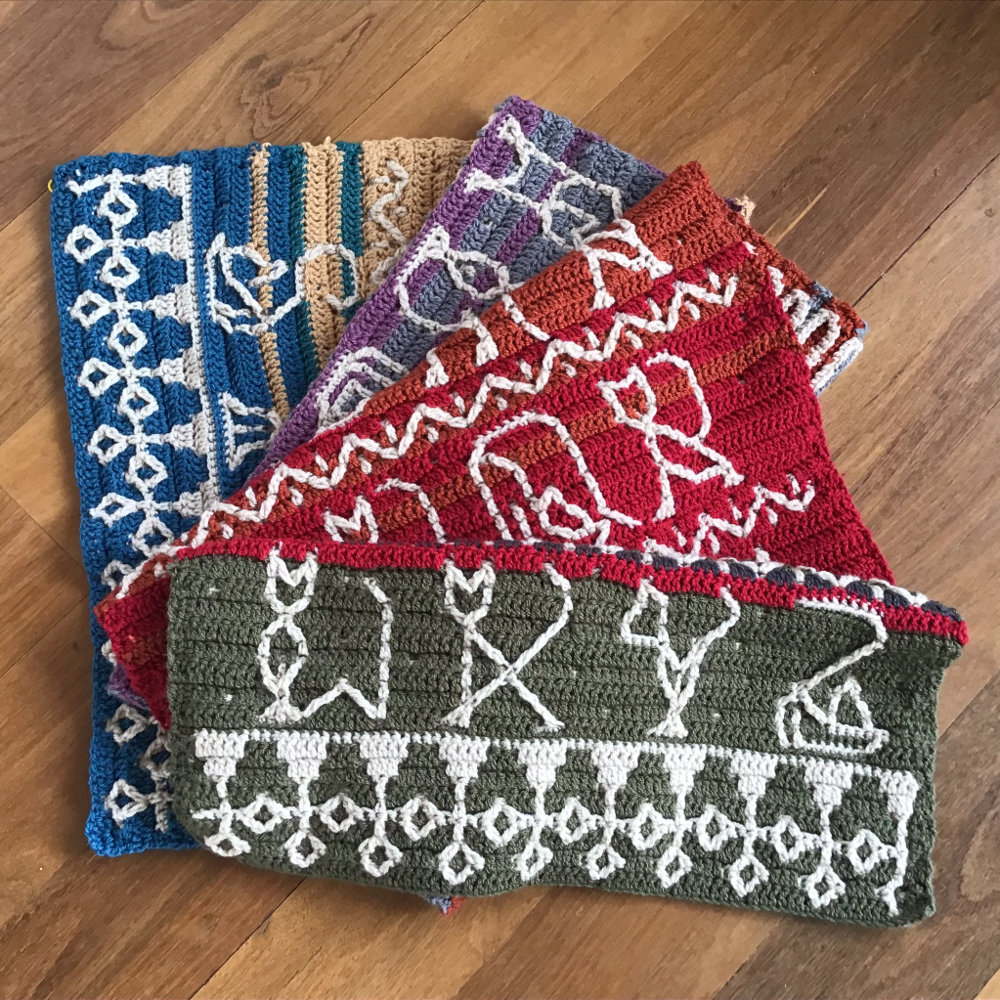
Take for example this “Cats” mosaic crochet I have been working on. You can see the extended range of ddcs on the RS which gives it the solid background. Then have a look at the WS where my finger is indicating one of the many “floppy” sections of unused back loops.
It is inevitable that you will these floppy stretches with some MC designs (which feature extended sections of plain background). You may not mind this and that is ok as they really are not a problem. But if you are a bit pedantic like I am, then this here is a tip to how to catch some of the long length of untouched back loops so that the WS is less “floppy”.
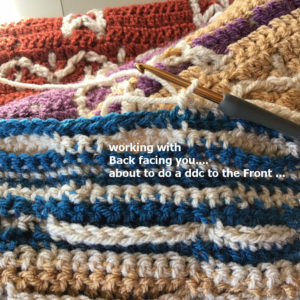
Work ddc with WS facing us…
Updated & Improved, 21 Sept, 2020
The section just above was worked with WS facing you. And while it helped with halving the “floppy” stripes on the wrong side of the work, … we still had some floppy bits.
This next section will help us eliminate those floppy stripes altogether.
Work ddc with the RS facing us….
Sorry I have to show you using another piece of work. I just figured this out and the work I used above has already been completed (yes, that had some floppy stripes on the WS 😏)
This may seem fiddly, but I can attest that it is actually easier to do! Yes, easier. And what takes me hours to photograph, edit, comment, explain … will only take you seconds to do once you try it out. And the bonus of course is, this tip is good for getting a smoother, firmer WS for those MC designs that have extended sections of solid background.
Tip 2: Slanted Lines in Mosaic Crochet
Let’s look at my Cats mosaic crochet again.
Credit: I found a royalty-free “alphabet cat” image on Pinterest that I modified quite extensively to create a MC graph.
You can see that this MC work is not typical of a repeating kind of MC pattern. And it involves, amongst other things, lots of slanted lines to create the outlines for the cats. So how do we create slanted lines in Mosaic Crochet?
I am not going into huge details here but will just lay out the core logic so you can adapt it to any situation. Things to keep in mind:
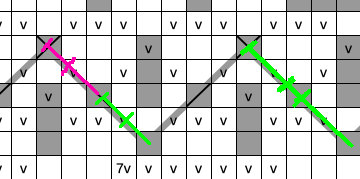
- slanted lines are created by dropping dc stitches (or tr, double treble, triple treble, etc. etc.) at a diagonal
- whether you are working on the RS or on the WS (and therefore using the trick I showed above of “peeking over” and working a ddc into the RS) – should not make a difference
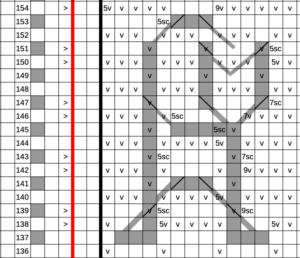
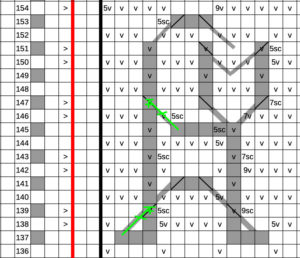
Have a look at this small section from my MC “cats” graph. There are many slanted lines of varying lengths in the full charted pattern. However this below will illustrate the basics. In the second image, you can see the crochet symbols (in green) of the stitches I used to create the slanted crochet lines. (Here it is working a (1sc1dc tog).) I hope that this explanation, while brief, will still prove illustrative of how to crochet slanted lines in any MC work.
Note that for longer diagonal lines, you might want to use longer stitches (e.g. trebles, double trebles, etc). I have no hard and fast rule as to how to crochet the diagonal lines. But briefly, here are some of the ways I do it.
I work a dc if the diagonal line is over 3 rows (as per graph), a treble of more if it is more than 3 rows.
Sometimes, I work 2 dc over 5 rows (rather than a treble).
Tip 2 (extended as at Jul 20201): If you need more assist, I have created more step-by-step photo on how to create diagonal lines when you are working on the WS.
Addendum/Update: alternatively, you do not have to do the (1sc1dc tog) I mentioned above and indicated in the green crochet symbols in the chart below. You can just crochet a drop dc (or hdc, tr, or whatever stitch you need) diagonally. Then you just skip one stitch from previous row, before working the next stitch (otherwise you will be increasing the number of stitches per row, and that is not what you want!)
I will be publishing the MC “cats” chart soon(ish). Not quite finished yet at the moment …. 😀 ♥ (Update Oct 2020: Finished and available – free pattern for Cats Pocket Scarf .)
Addendum:
Dec, 2020 – Chinese Box Top pattern is now available. It uses this CMC crochet technique.
References:

Hi 🙂 yesterday I found your blog, and I just want to say thank you for sharing your great cmc technique! If once understood, it is a logical enhancement of classic mosaic.
If you want your brain to explode, i also found a video explaining “Reversible Continuous Overlay Mosaic Crochet (REV-COM)” on youtube, which creates two beautiful sides by replacing some sc with dc worked into the back side of the work. Maybe you want to incorporate this into your CMC technique some boring day in the future 🙂
I am very happy that I found your website although it is a few years later then most comments. I hope you still read it. I crocheted along and think that your steps are amazing. The pictures really helped! I was trying to be fancy using a varigated yarn for Yarn A but will do it again with only two colors for better results. I am just having problems knowing if I am grabbing the right yarn 2 rows below. I am sure with more practice I can learn this.
I use the “old” method of chaining where there will be a drop down double crochet and it is difficult to break that but I love the clean look of your work. It is fun to learn something new.
Thank you for this! Reading, and re-reading till I understand
But one question….once I understand this properly…Can I use this technique on all Mosaic patteens? Can I “translate”?
I am enjoying your page! I am Really wishing at this moment i was this kind of learner! If you ever make a video tutorial or YouTube page- I am there! I’ll keep trying … Thank You!
Thank you so much! I’ve been trying to learn mosaic crochet forever but it never really made sense to me until I read your instructions and I finally had that light bulb moment where things just clicked and I got it. Again thank you!
Hi Helena! Firstly a massive thank you! I’ve been wanting to mosaic crochet but those ends and that double border completely threw me off!
And when I find your cmc- I don’t have yarn on hand for it!
BUT I do have some sock yarn in 2 colours that I was contemplating for a moss stitch project that everyone seems to be into these days. Again the ends !
So hey presto! Your LDC ends border with the colour B ending within the frame and moss stitch are currently getting married! The only difference is – I did both a chainless foundation Sc row, followed by a second row of Sc in colour A. This way I have a 2 stitch border all around!
Thank you so so much! I will figure out how to send you the picture if I succeed!
Hello, thank you for your feedback. And your enthusiasm … which just bursts through. I didn’t know that the moss stitch project was the current rage at the moment. I presume that this is just the standard moss stitch, right?
Sounds like you will be having lots of intriguing fun. This is the best part I think … when you see/hear something that sparks off another useful idea for a new way of doing things. Good luck!
Hi I understand why the inner colour needs two chains to bring it to height. The outer colour however is confusing me. I did my row one across and ended with a marked loop. Then the second row same direction. Now when I go to do the two double crochets with the first colour for the third row I don’t know what to do. Do I chain two and it counts as a double crochet? Or what? Does my question make sense?
Thank you
Hi Dionne, I am so sorry you are having some trouble with this method. But to be honest, I have re-read your questions multiple times and I am sadly still unsure what you are asking. So I can’t really help at this stage. I can only hope that you will get one of those wonderful and not uncommon “Ah-ha” moments. Good luck!
Dionne,
I think I understand your question. When you finished working both colors, you marked the outer color with a stitch marker, and the instructions say to start the next row with 2dc. I think you are asking the question because in regular (non-mosaic) crochet, when you start the next row, you chain a certain number of stitches in order to set up the next row, and we’re usually told that those few chained stitches count as the first dc (or whatever stitch you will be using to start the row). So the first stitch will often be written like ‘ch 3, counts as dc’, or something like that. In the case of this method, you just forget about that idea. Just jump right into doing a dc in the first stitch and a dc in the second stitch. If you go back to the chart above, those 2dc would be the two highlighted yellow boxes on each side of the graph. They are just 2 regular dc stitches worked in the usual way, with no special starting method.
You only need to start the inner color with 2ch to bring the yarn to the correct height. The outer color needs no such adjustment. I hope that helps!
Thanks for your tutorial – I’m very excited to learn this new technique and really appreciate your time and energy in creating this page 😀
I came here to ask this exact question! I’ve done the mm cast on and the first row of sc, so I’m at the stage of starting the 3rd row (row 2 on the chart) with 2 dc in the cast on colour, however without any chains to get height, the first of these is kind of rounded and squashed as there’s nothing to get it to the height of a dc. The only way to make it not look squashed is to let the first loop the hook goes through when returning to that point become very elongated. I would post a photo if I could. Does that explain the question well enough for you to comment?!
Hi deathzerozero, sorry to make you wait for my reply. It has been bedlam here,
I gather you are talking about this row?
And in particular, the 2dc that starts the row. You start the dc however you normally do it. It can be with the conventional 3chs (to represent a dc) or the chainless dc (you can see how that is done here). However you start a normal dc row is ok. I just didn’t specify how to do that as I assumed most people would just use the starting dc they are most comfortable with.
I hope that helps and answers your question. Cheers, Good Luck, and have Fun!!
The Clean Mozaic Crochet is for me absolutely impossible to understand. Maybe some time you could make a video tutorial. I can very god work the other two methods, but with that one I’m very confuse.
I might not be the only one.
Thanks a lot
Hello, I wish I could do a video. But first, I have so many projects and writing piled up, I have no time to learn how to make video tutorials. I have tried and even bought some fairly expensive equipment but it is not as easy as it seems and I hate those unclear, shaky videos we sometimes see online. So for me to do a video tutorial, I need time and advice on how best to do a good one so I can do the best I can. But it is a full circle … coz I have too many other projects on the go to devote time to that.
I apologize. I know it is frustrating. But if you think back to the days before youTube (if you are old enough!) … we all managed to learn really complex techniques just often from old fashioned, paper magazines!
I hope someone who has mastered the CMC (Clean Mosaic Crochet) will be able to do a clear video tutorial at some stage. Good luck.
Try this video: https://www.youtube.com/watch?v=6sizmhaxbYI. The video creator calls this method ‘Endless Mosaic Crochet’, but the idea is the same: you work two rows from the RS, flip the work over, and then work 2 rows from the WS. The tricky part is that when you work from the WS, the pattern in your chart is worked ‘backwards’.
Think of it this way: when you are working with the RS facing you, you are doing the double crochet stitches on the front of the work (the RS), and the sc stitches are in the BLO – but that is the BLO from the RS of the work. So when you do two rows on the RS and then flip the piece over and work 2 rows from the WS, you have to continue doing the double crochet stitch on the RS of the work (which is now facing away from you) and the sc are still being worked in the BLO from the RS side, but those *look like* sc in the FLO because the work is flipped around.
Note in the video above there isn’t any adjustments for a special border, nor is there an inner and outer color. It’s just working colors A & B from the RS, then colors A & B from the WS, etc.
Hi. I have practiced with the test swatch twice and I think I have the method down. Now I am looking at the bigger chart and am wondering if there will be a size difference when using CMC on an Inset MC chart, since inset has two rows of the same color per row on the chart, and the CMC method is one row per color. Thanks!
Hi Amie, yes the CMC will result in a more compact/shorter than if you were using the the Inset/Chain-Space Mosaic Crochet method.
The article dealing with the differences among the different MC methods will give you some visual indication of the differences.
Hey again haha I think I figured it out. I as repeating the center of each pattern row not the pattern of 1-20, 1-20.. thanks again for the great tutorial
Hi Kelly! Clever! Well done! Well done! You are exactly right. In LillaBjorn’s Nya pattern, the 20sts are the repeating pattern. So if you were using my CMC (Clean Mosaic Crochet) method and her chart, instead of starting with 160 stitches, you would have 162 sts (if you wanted a 1-stitch border on each side).
Hello! Love this tutorial successfully made your sample. I’ve tried twice to make the Nya Mosaic Blanket with your chart and technic.. but it doesn’t seem to add up if you just repeat the pattern. Help! On her website she starts with 160 sc for the baby blanket. which made sense to me because there are 20 squares on the chart. But it doesn’t line up properly. Any tips are appreciated! Thank you so much for your time
The Nya chart is a 12-square repeat, and the chart on her site (https://www.lillabjorncrochet.com/2019/07/nya-infinity-mosaic-blanket.html) is 24 squares wide plus two extra stitches on one end, and one extra stitch on the other. Her instructions are a little unclear: she says to start with any multiple of 12 sts + 3 sts (ch4), but then says to use ch 160 for the baby blanket. That should be ch 164. (That’s a 12 stitch repeat, worked 13 times, with the + 4ch.)
Since the Nya pattern has one extra stitch on one end and two on the other, you’d have to make one adjustment to use Helena’s method: you want to have 2 stitches on each side of the row, and then only work the pattern 12-stitch repeats between those 2 stitches. So, instead of starting with ch 164, start with ch 165, and make sure you do the 2dc on either end of your row.
Hi Helena,
Do you have any tutorials on how to design your own mosaic using actual shapes, like a skull or a boat? I see tons of videos online and even websites instructing how to create one making designs in Excel but none on how to add a shape.
Your MM cast on is awesome!!!
Just a quick question…… when you turn the foundation row to start first sc row, you go into 2nd stitch. Does this mean that an extra foundation st is needed as it becomes the turning chain.
Hi Megan, thank you for your comments.
You don’t turn after foundation row (R0). You start the next row (R1/B) in red col. 2 stitches in; starting from the same side where you started R0 .. and work towards the loop (with marker) at the end of R0/A.
Please note that while I love it, the MM cast on is only my easy-to-remember nickname for it. I cannot take credit for it. Rather, it goes to MellowMe on YouTube. She has copyrighted the technique, and the technique has it own (long) name. It is a great cast on technique!
Thank you for your reply. I was thinking that I’ll probably use it for all my projects, not just mosaic!
Also, possibly a tip for anyone…… when I get to the last ‘inner’ stitch, I chain 2 straight away. I found that it helps to keep it out of the way better, and gives a firmer ‘top’ to work into on the next row.
Ok, I am going along fine until the end of row 3 at the Right Edge – But as I began, I had a few problems, one was that I forgot to make my MM Cast On for row 0 with larger hook size or two, so that caused a couple problems, and the main problem I had is that I had forgotten how to read the chart from the other posts, specifically the ‘rules’ about what the squares mean as far as how to determine whether to do a sc or dc, (I would’ve been lost without the v’s added to the chart, as did the fact that you wrote out the sts to make for each row in the directions) so I had to go back to the other blog post to refresh my memory – Which brings me to where I’m stuck:
Is this a mistake, or is it me not remembering how to read the chart? At the end of Row 3, at right edge, there is a V in the last square, it is a “black” square on top of another black square from row below, just like the other three DDC’s in the same row, so shouldn’t that stitch be a DDC rather than a sc? In the written instructions, it says, “(1sc, 1ddc) x3, 4sc” – but shouldn’t that last, 4th sc be a ddc instead?
I looked at the photos of your crochet work, and you did, in fact, make a sc rather than a ddc, but I cannot figure out how to determine WHY that is a sc vs a ddc from the chart. In other words, if I had not seen your photis or the written instructions of “(1sc, 1ddc) x3, 4sc”, I would’ve made that last stitch a ddc. What am I missing? Does it have something to do with the fact that it’s a square that is on top of a beginning square from Row 2? Also, why is there a “V” in the square, and why does square look exactly the same as the other ddc squares of the same row? I have re-read the other mosaic blog posts where you explained the charting, but I’m still stuck and confused. Thank You.
Hello again Anna! You have Eagle Eyes! And I love it! Thank you!
1) MM cast on – it is ok to use the same hook size as for body of work. I do a lot of the time. Just remember to keep it fairly loose – not tight; relaxed hands.
2) R3. You are brilliant. And you are correct. My mistake. After having had to modify and correct a few notations in one img after another (there are over 50+ images to manage to this page), I did not remember that some of the written instructions had to be updated as well. So thank you SO MUCH for doing your test-runs.
I have re-touched the R3 images and corrected the written instructions. Thanks!
3) end photo of R3: you said, “I looked at the photos of your crochet work, and you did, in fact, make a sc rather than a ddc,..” …actually the red yarn ends with a ddc as per instructions. Sorry the photo was a bit confusing. That was a photo of the WS and that is why it looks like a sc from the back. I have now added a WS notice to the photo to prevent more confusion.
Once again, thank you Anna for your meticulous eye to detail and the amount of time you took to write out you question in such detail and clarity.
You would make a great pattern tester!!! Do you ever do that?
♡
I thought it was me, that maybe I was not remembering some special “rule” about the squares. Thanks for letting me know what’s going on – yes! blog posts, instructions, photos, uploading, etc are A LOT of work, so I understand!
After I wrote that comment, I just continued on, I made that stitch a sc, and continued practicing reading the chart (I had started this swatch yesterday, put it down, and continued with fresh eyes today) and I got a huge surprise! After Row 5, reading the chart and doing your new method just clicked, and I was done with Row 10 very, very quickly! I did Rows 5 through 10 in less time than it took me to do 1 row yesterday! Now I get it, it’s just like you said somewhere in this post, it just takes a bit of practice and getting used to, so for everyone who feels discouraged at first, it’s just like anything else, it takes some practice, but not much at all.
About pattern testing: I’ve never been a pattern tester, but I would like to, I am someone who pays a lot of attention to detail, I like to know WHY and how things work, the theory behind it all.
Here’s a link to a photo of my practice swatch – it’s very, very messy, and I did the foundation row too tight, and I ended up cutting my yarn once because I didn’t keep one of the colors on the proper side, and I didn’t bother making the edges neat, but I was focused on the chart, so, that’s my excuse! https://flic.kr/p/2jVRVzV
Now that puts a big smile on my face! Congratulations! For your eagle eyes, for your determination, for your feedback, for your success! Bravo!
Yes, it does get better and quicker, pretty quickly.
As for pattern testing, maybe I can keep your email and contact you should I ever want pattern testing down? You don’t have to do it because you might not be interested in some patterns. Only if the pattern interests you of course. I am not sure if I will ever have pattern testers but it is something I have thought of, on and off.
Do you do other types of crochet or are you only interested in Mosaic Crochet?
BTW .. I love your practice swatch. Thank you for sharing it. Well done. Bravo. You can now play with the free Cats Pocket Scarf pattern 😀
Actually in the near future, I will be adding a new upgrade to this tutorial as I have discovered another way of doing the CMC – maybe an even better way. Till then, thank you for the feedback and big congrats for such a determined, successful effort.
Yes, I would be glad to test some of your patterns – I do all types of crochet, like Irish lace, overlay, surface, Tunisian, tapestry, you name it. Do you have my email from my replies?
I am looking forward to your upgrade to mosaic! I will send you an email soon, as I came up with some tricks for the dc edges, and also with working into the Perfect I cord foundation that makes it easier.
For those of you who are doing this type of mosaic the first time, please know that you will understand when you follow along while doing the actual crocheting – it’s one of those things where it’s much easier than the written instructions make it seem.
When I did Helena’s other mosaic & overlay tutorials, things became more clear when crocheting along. But there’s good reason for all the written instructions, so we can refer back to when learning, due to the nature of how certain things can get easily confused.
Thank you Anna! Yes, please crochet along with the written tutorial. I am sorry I still don’t know how to do a close-up video. But personally, many a time, I prefer written tutorials for myself. Because with written tutorials, when I need to remember just that one bit in the middle of the whole thing, I can more easily locate the needed info in written (& photos) tutorial than trying to go move a video forward and back, to find that info.
Anyway, as Anna says, please everyone, crochet along for better clarity. Thanks Anna!
In your first example, in the text description for R3, it says to do 2 chains to raise color B to the new height. On the accompanying photo it says 1 chain. Seems like it should be two since color B is moving up two rows, but could you confirm? Thanks!
I used 2 chains and that seemed fine. This technique works beautifully! I’m looking forward to making something larger with CMC.
New issue: I found a couple of places in your big chart (https://www.clearlyhelena.com/wp-content/uploads/2020/09/CleanMosaicCrochet_howto-003.jpeg) where a drop marker is missing: along the right-most column of the black box pattern region, in rows 3 and 7.
Hi again Ari, thank you for pointing out the missing “v”s. I have rectified the image. Thank you. I have also added a note (and will do so henceforth in future patterns) to make it clear that the “v”s are manually added but users should and will want to be able to read a mosaic chart even without the “v” indicators. Thanks for your eagle eyes! 😀
Hi Ari, thank you for pointing that out. I originally started with 1ch to bring up the starting row but over time, like you, found that 2 chains worked better. I changed the text but didn’t look at the photos. Have rectified it now. Thanks again.
Totally confused lol! I need to see this.in real life.(I want to do cats pocket scarf!)… Do you have videos showing these techniques? Thank you!!!
Hi Cindy, I am so sorry that the written CMC tutorial was confusing to you. I still haven’t gotten a handle on how to do a close up, clear, and focussed video tutorial. So I am sorry I don’t have one. Usually, with tutorials, especially written/photographic ones, it works best and is much more understandable if you crochet along. Maybe you can try that?
Good luck.