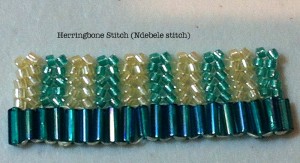
This Herringbone Stitch or Ndebele Stitch bead weaving article is meant for beginners as well as anyone looking for a quick memory refresh. First the refresher, then the tutorials.
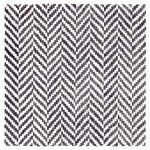
As a mnemonic aid, it is useful to know that Herringbone stitch gets its name from how the pattern resembles fishbones. This stitch is also commonly found in embroidery and knitting.
Herringbone Stitch: Refresher/Memory Joggers
Beading
- foundation (starting) row is made up of Ladder Stitch
- even number of beads per row
- each row thereafter, beads are worked in pairs
Characteristics of Herringbone or Ndebele Stitch
Tip: Having swatches or samples of various stitches is always a good idea. It helps determine which stitch might be the most appropriate.
The Ndebele/Flat Herringbone stitch is:
- quite rigid, row-wise
- very flexible, length-wise
Herringbone Good For
The herringbone stitch lends itself very well to increases and decreases. This characteristic makes it wonderful for:
- making frills
- creating various shapes
Refer: how to make increases in Herringbone Stitch.
Quick Revision Summary on How to Make the Flat Herringbone Stitch
Tips and Tricks to the Herringbone/Ndebele Stitch
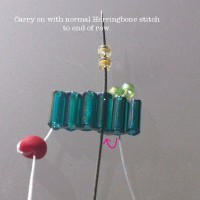
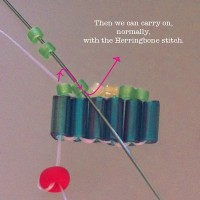
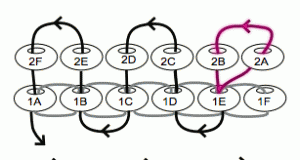
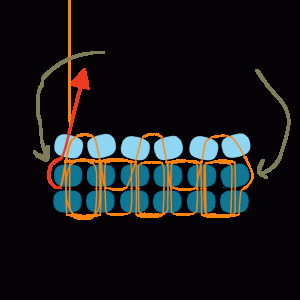
The “tricks” in the Herringbone stitch comes at the end and start of each row. Remember to:
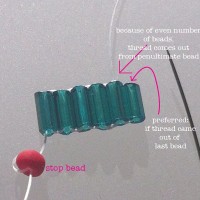
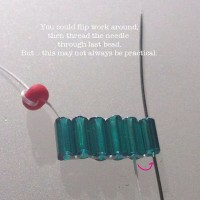
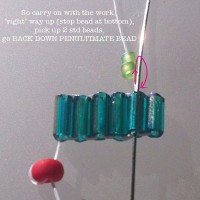
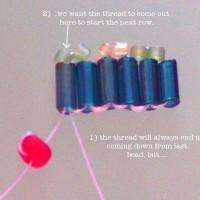
- Because we work with even number of beads, you will find that in the foundation (Ladder stitch) row, your thread will end up coming out of the penultimate bead.
It would be great if it came out of last bead. You can flip the work around (so stop bead is at top). But that might not always be possible, e.g. in the middle of a project. - 2 beads are picked up and needle goes down the same penultimate bead. (This prevents having thread showing on the outside edge of beads)
- beads are always worked in PAIRS
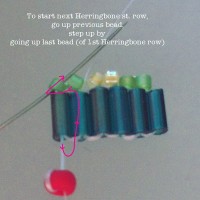
- to start a new row, needle always comes up out of penultimate bead of previous row >> cross over to end bead of current row >> begin herringbone again
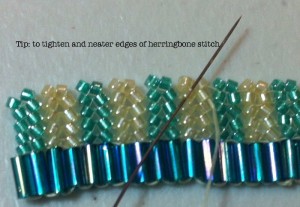
Tip: Neatening and Tightening the Edges
This is optional. The ending edge of the herringbone stitch might seem a bit loose and “fray-ish”. You can easily tighten this edge by weaving your thread along the penultimate row of beads.
Tutorials on how to do the Herringbone Stitch
There are a number of these tutorials out there. So I am not going to bother to write another one from scratch. However I have researched what I think are the easiest and the clearest.
Leslie Rogalski’s Flat Herringbone Stitch (from Artbeads)
The first part of this tutorial where she draws on a graph to show how the threads are woven is especially useful and clear.
However the rest of the tutorial is a bit different from how I do it. I find it a bit confusing and less satisfying as 2 rows of herringbone are made before tightening occurs. Hence the work is floppy for a longer time (which is always no fun). But the first part of the video is very clear and recommended.
The accompanying Flat Herringbone Stitch pdf file – written instructions with diagrams (from ArtBeads) is also very useful.
In particular, it shows diagrammatically and clearly, how to begin a new row (as discussed in the Tips and Tricks section above).
Basic Herringbone Stitch (from FusionBeads)
This Basic Herringbone Stitch tutorial – is will laid out, with clear steps and diagrams. There is also a printer friendly version.
The only downside to this tutorial is that the way they do their new rows leaves the thread showing on the outside beads. Not so neat and tidy. So I would still recommend the method above (in Tips & Tricks section) of starting a new row.
See Reference section below for more related topics and relevant tutorials or view “Herringbone Stitch – How to Increase“.
Reference
- Herringbone Stitch on Pinterest
- handmade-jewelry-club.com: DIY How to do Flat Herringbone Stitch Tutorial

Excellent information! And I love the way to start new rows without thread showing 🙂
Wonderful! Thank you Jane! It is always wonderful to learn a new beading how-to tip isn’t it?